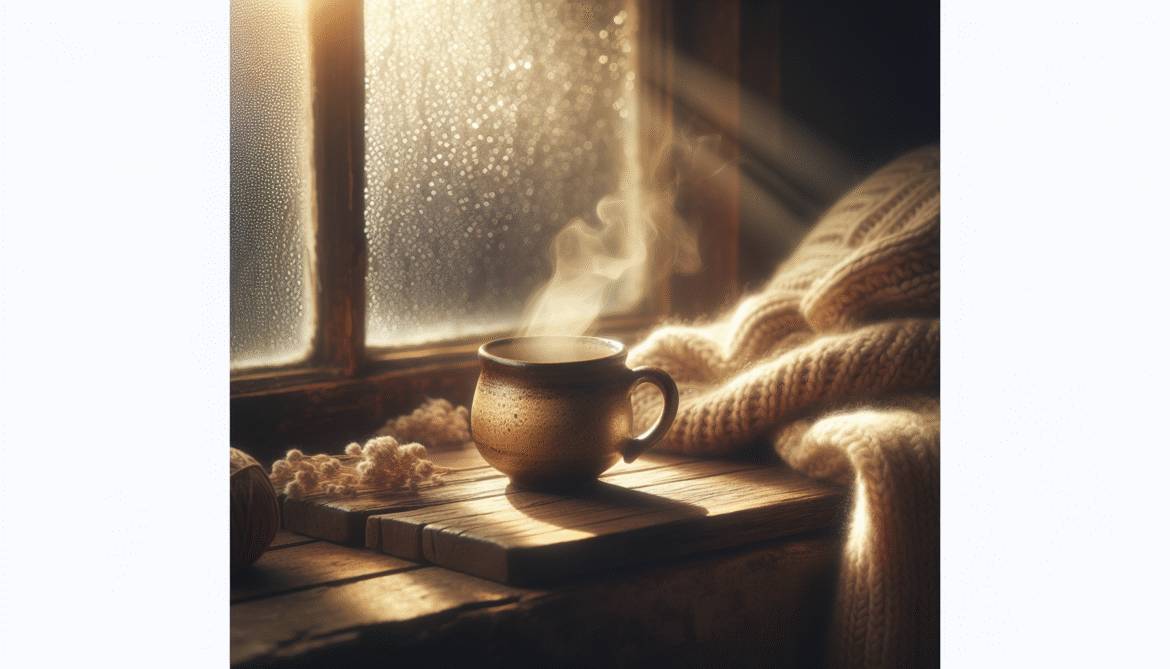
Have you ever wanted to capture the perfect cozy mug photo by the window that feels warm, intimate, and shareable?
Cozy mug photo by the window
This article shows you how to plan, shoot, and edit a cozy mug photo by the window so your images look intentional and inviting. You’ll learn practical tips for composition, lighting, camera settings, styling, and post-processing that work whether you use a smartphone or a camera.
Why a mug by the window is such a compelling subject
A mug by the window combines simple objects with natural light and a real-life setting, which makes it emotionally resonant and visually pleasing. You can create mood, tell a tiny story, and evoke feelings of comfort with modest tools and thoughtful choices.
What makes a “cozy” photo feel cozy
Cozy photos usually include warm tones, soft light, context clues (blanket, book, plant), and a sense of stillness. When you understand which elements contribute to that mood, you can arrange them to convey warmth and relaxation reliably.
Choosing your mug
Selecting the right mug is one of the first creative choices you’ll make, and it affects color, shape, texture, and storytelling.
Consider shape and size
Round, wide mugs feel different from tall, slim ones; wide mugs often look more approachable and inviting, while tall mugs can feel elegant. Choose a shape that aligns with the mood you want to convey.
Think about material and texture
Ceramic, enamel, matte, glossy, or handmade textures all influence reflections and tactile appeal. Matte ceramics reduce harsh reflections, while glossy glazes can catch window highlights in interesting ways.
Color choices and patterns
Solid neutral tones make the drink the hero; patterned or colorful mugs can add personality and contrast. Match or contrast the mug with your background to create visual harmony or a focal point.

This image is property of images.unsplash.com.
Selecting the window and background
The window is your main light source and part of the scene composition. Picking the right window and background helps control reflections, shadows, and storytelling cues.
Window size and direction
Large windows deliver soft, even light; small windows can produce dramatic contrast. North-facing windows give cool, consistent light; east windows provide gentle morning light; west windows give warm late afternoon light. Choose based on the mood you’re after.
Background considerations
Backgrounds can be simple (plain wall) or contextual (bookshelf, plants, city view). Keep the background uncluttered if you want the mug to pop, or include subtle props that tell a story without overwhelming the frame.
Managing distracting reflections
If your mug is glossy, you may see unwanted reflections in its surface. Move the mug, change camera angle, or use a diffuser to control those reflections so they enhance rather than distract.
Time of day and natural light
Light quality changes throughout the day. You’ll want to choose the time that complements your desired mood and offers manageable lighting conditions.
Morning and soft light
Morning light is often soft and cool, lending a calm, fresh feeling to photos. This is great when you want a tranquil, serene image — perfect for a quiet coffee moment.
Golden hour and warm tones
Late afternoon or golden hour light brings warm, low-angle light that casts gentle shadows and gives a cozy glow. This time is ideal when you aim for warmth and rich color.
Overcast days and diffuse light
A cloudy day acts like a giant softbox, softening shadows and reducing contrast. This is useful for evenly lit shots and for photographing steam without harsh highlights.

This image is property of images.unsplash.com.
Composition and framing
Composition helps guide the viewer’s eye and communicate the story you want in a single image. You can use classic composition techniques or create intentional asymmetry.
Rule of thirds and focal points
Place the mug off-center to create visual interest and allow space for supporting elements like a book or hand. An off-center focal point often feels more natural and intimate.
Negative space and balance
Negative space can emphasize the mug and add a minimalist aesthetic. Balance negative space against any props so the composition feels intentional rather than empty.
Eye-level versus top-down
Eye-level shots highlight the mug’s exterior and the scene, while top-down shots emphasize surface details like foam art, cookies, or the table texture. Try both to see what conveys your story best.
Camera gear and lenses
You don’t need expensive gear to get great results, but understanding how different equipment affects the final image will help you choose wisely.
Smartphone vs dedicated camera
Modern smartphones are excellent for window-lit mug photos due to computational photography and portability. If you own a DSLR or mirrorless camera, you’ll have more control over depth of field and exposure.
Lenses and focal lengths
For cameras, a 35mm or 50mm prime lens (full-frame equivalent) produces a natural perspective; 85mm creates pleasing compression and background blur. Macro lenses are great for close-up texture and steam detail.
Tripod and stability
A small tabletop tripod can help you create consistent compositions and allow for longer exposures in low light. For handheld shooting, steady your arms and use burst mode to increase chance of sharp shots.

This image is property of images.unsplash.com.
Camera settings — practical guidance
Knowing your settings helps you react to changing light so your photos stay crisp and well-exposed. Below is a practical table for common scenarios.
| Scenario | Aperture | Shutter Speed | ISO | Focus Mode | Notes |
|---|---|---|---|---|---|
| Bright morning, smartphone | Auto / f/2–f/4 | 1/125–1/250 | 50–200 | Tap to focus | Use HDR if available for balanced exposure |
| Golden hour, camera | f/1.8–f/2.8 | 1/125–1/250 | 100–400 | Single point AF | Wider aperture for shallow DOF |
| Overcast, indoor | f/2–f/5.6 | 1/60–1/125 | 400–800 | Single point AF | Use tripod if shutter <1 />0 |
| Low light, desired motionless scene | f/2.8–f/5.6 | 0.5–2s | 100–400 | Manual focus | Use tripod and remote trigger |
| Steam capture | f/2.8–f/5.6 | 1/125–1/250 | 400–800 | Continuous AF | Faster shutter helps preserve steam detail |
Aperture and depth of field
A wide aperture (low f-number) isolates the mug with creamy background blur; a narrower aperture keeps more of the scene in focus and works for top-down flat lays where you want detail across the frame.
Shutter speed and motion
If you’ll include steam, hands, or outside movement, choose shutter speeds that prevent blur while keeping enough light. For very low light, use a tripod to avoid camera shake.
ISO and noise control
Higher ISO increases brightness but can add noise. Use the lowest ISO practical and rely on aperture or tripod support to keep images clean.
Using natural light and modifiers
Natural light is your main tool. You can shape it with simple, inexpensive tools to achieve magazine-style results.
Diffusers and reflectors
A diffuser (sheer curtain or translucent panel) softens harsh sunlight and reduces hot spots. A reflector (white foam board) bounces light back onto the mug to lift shadows and reveal texture.
Flags and black cards
Use a black card to block or subtract light from areas you want to deepen. This helps add contrast and prevent flatness, especially when the background is too bright.
Directional light and rim light
Side lighting emphasizes texture and steam, while backlighting (light behind the mug) can highlight steam and create a glowing rim. Choose direction based on the effect you want.

Styling and props
Thoughtful props add context but shouldn’t overpower the main subject. Use texture, color, and scale to support your mug.
Minimalist vs narrative styling
A minimal setup (one mug, plain surface) highlights simplicity and calm. Narrative setups (book, knit blanket, cookie plate) tell a story and suggest a lifestyle.
Suggested props and how to use them
- Small stack of books: suggests a reading moment.
- Soft blanket or scarf: adds texture and seamless color.
- Fresh flowers or greenery: introduces life and color contrast.
- Pastry or biscuits: adds an edible element and interplay between warm and cool tones. Use props sparingly and place them at different depths to enhance depth of field.
Color palettes and mood boards
Choose a palette that complements the drink and mug — warm earth tones for autumnal coziness, muted pastels for a gentle morning, or high-contrast monochromes for a modern look. Creating a small mood board can keep your choices consistent.
Capturing steam and warmth
Steam adds a sensory cue that communicates warmth, but it can be tricky to photograph.
Timing and heat
Photograph shortly after pouring while the surface is hottest. If steam is minimal, try pouring over the rim or re-heating the drink between frames.
Backlighting for steam visibility
Backlight or sidelight emphasizes steam against the background. Slightly underexpose to increase contrast so steam stands out more clearly.
Using a fan and multiple pours
A gentle fan can push steam in a pleasing direction, creating visible swirls. Multiple pours let you restart steam production for multiple takes.

Editing and post-processing
Post-processing refines the mood and corrects technical issues. You can keep edits subtle for naturalism or go stylized for a dramatic effect.
Basic workflow
Start by cropping and straightening, adjust exposure and contrast, correct white balance, apply sharpening and noise reduction, and finish with color grading for mood. Keep adjustments consistent across a series.
Color grading for coziness
Increase warmth by slightly raising temperature and adding muted orange/brown tones in highlights and midtones. Lower saturation a little for a soft, film-like look, or boost muted colors for a cozy, vintage feel.
Local adjustments
Use local tools to dodge (brighten) important areas like the mug rim or foam and burn (darken) distracting highlights. Apply selective sharpening to texture areas and mask noise reduction to smoother regions.
Recommended apps and software
- Smartphone: Lightroom Mobile, Snapseed, VSCO.
- Desktop: Adobe Lightroom Classic, Capture One, Affinity Photo. Each offers tools for exposure, color grading, and selective edits; choose what matches your workflow.
Shooting handheld vs tripod
Deciding between handheld and tripod affects composition freedom and image quality.
Benefits of handheld shooting
Handheld lets you move fast, try different angles, and capture candid moments (e.g., someone lifting the mug). It’s ideal for spontaneous lifestyle shots.
Benefits of tripod shooting
Tripods enable consistent framing, longer exposures, focus stacking, and precise composition for planned shots. Use a small tabletop tripod for window scenes to keep setup compact.
Focus techniques and depth of field control
Getting the correct focus point ensures the mug feels sharp while background blur adds mood.
Single point vs continuous focus
For still subjects, use single-point AF and place the focus on the mug rim or any texture you want to highlight. Continuous AF is helpful if you’re including movement like steam or a hand.
Focus stacking for full sharpness
If you want the entire scene sharp from mug to background, take multiple shots focused at different distances and blend them in post. This works well when using a tripod and small aperture.
White balance and color profile
White balance determines the perceived temperature of the scene. You can set it in camera or adjust in editing.
Presets and custom WB
Use presets like “Shade” or “Cloudy” for warmer tones, or set a custom white balance by using a neutral gray card. Shoot in RAW for greater flexibility in adjusting WB later.
Color profiles and consistency
Use a consistent camera color profile for a series to maintain a cohesive look. If you shoot RAW, apply the same base profile in editing to streamline your workflow.
Safety when photographing hot beverages
Handling hot liquids near photography gear and electronics requires caution to avoid burns and damage.
Safe pouring and staging
Pour drinks away from your camera and phone and allow steam bursts to subside before moving gear. Use coasters and stable surfaces, and keep electronics at a safe distance.
Protecting gear from spills
Have absorbent towels on hand and set delicate gear on elevated or protected surfaces. Consider using plastic covers for lenses if you’re working very close to splashes.
Storytelling with a single frame
A good mug photo tells a tiny story that invites the viewer to imagine the moment.
Characters and implied action
A hand entering the frame, an open book, or a window view suggests a human presence and creates an emotional connection. You don’t need to show faces to imply the person behind the scene.
Themes and seasonal narratives
Make the image say “autumn morning” or “rainy afternoon” with props, lighting, and color choices. Small details (fallen leaf, candle, wool) cue the season and enrich the narrative.
Social media presentation and captions
How you present the photo can change how it’s interpreted and engaged with on social platforms.
Cropping and aspect ratios
Different platforms favor different aspect ratios (Instagram square or 4:5, stories vertical). Crop for the platform while preserving the composition’s balance and key elements.
Caption ideas and tone
Write captions that complement the visual mood with short stories, questions, or sensory descriptions. Keep the voice consistent and invite interaction with simple prompts.
Printing and displaying your photos
Printed images allow you to enjoy the texture and color fidelity of your work in a new way.
Choosing paper and size
Matte or fine art paper gives a tactile, cozy feel that suits mug photos; glossy finishes can make colors pop but show reflections. Select print sizes based on display space and viewing distance.
Framing and styling for display
Select frames that match the mood: simple wood frames for warmth, black frames for modern minimalism. Consider grouping a series of related images for a vignette wall display.
Troubleshooting common problems
You’ll likely encounter a few recurring issues; knowing how to fix them quickly will save time and frustration.
Overexposure of highlights
If window highlights blow out, reduce exposure, use a reflector to fill shadows, or bracket exposures and merge in post. Shoot in RAW to recover highlight detail.
Flat lighting or boring image
Introduce directional light with a reflector or move the mug to a side where light creates depth. Add a subtle shadow or a prop with texture to add interest.
Distracting reflections in glossy mugs
Change the angle of view, move the mug, or use a polarizing filter (on compatible lenses) to reduce reflections. Matte mugs eliminate this issue entirely.
Checklist and quick settings reference
Use this checklist before shooting to ensure consistent, professional results.
| Step | Action |
|---|---|
| 1 | Clean the mug and surface; remove dust or fingerprints |
| 2 | Select window and determine light direction |
| 3 | Choose time of day and set camera settings roughly |
| 4 | Arrange props and create depth with layers |
| 5 | Place diffuser or reflector as needed |
| 6 | Take test shots and adjust exposure and composition |
| 7 | Capture steam by timing pouring and using backlight |
| 8 | Review images and bracket if necessary |
| 9 | Edit RAW files with consistent color grading |
| 10 | Export for web or print with correct color space |
Creative prompts and practice exercises
Practicing targeted exercises improves your eye and technical skill quickly.
Prompt ideas
- Photograph the same mug at three different times of day and compare the mood.
- Create a series with different backgrounds but the same light to isolate compositional changes.
- Shoot steam as the main subject, experimenting with backlight and silhouettes.
Weekly practice plan
Spend one day shooting morning light, one day on golden hour, and one day doing overcast soft-light setups. Review and edit at the end of the week to track progress.
Final tips and encouragement
Mastering a cozy mug photo by the window is as much about mood and patience as technique. Keep experimenting with light, props, and editing until your images match the feeling you want to convey. You’ll get better with each deliberate attempt, and small improvements in composition or lighting often make the biggest difference.
If you’d like, tell me what gear you have and the kind of mood you want, and I’ll give you a personalized setup and step-by-step plan for your next shoot.