? Are you thinking about bringing a homegrown coffee plant into your living space or garden and want to know everything before you buy?
Homegrown coffee plant for sale: an overview
You can grow coffee indoors or outdoors depending on your climate, and purchasing a homegrown coffee plant can be a rewarding way to learn where your brew begins. This section gives you a quick overview of what a homegrown coffee plant is and what to expect when you buy one.
What is a homegrown coffee plant?
You’ll be working with plants from the Coffea genus, most commonly Coffea arabica (Arabica) and Coffea canephora (Robusta). These plants produce the coffee cherries that contain the beans you roast and brew.
Why choose a homegrown plant over store-bought beans?
Growing your own coffee connects you directly to the entire lifecycle of coffee — from flowering and fruiting to processing and roasting. You’ll experience months of growth and the satisfaction of turning cherries into a cup you produced yourself.
Types of coffee plants commonly sold
Knowing the common varieties helps you choose a plant that fits your climate, patience level, and flavor expectations. Each variety has its own growth habit and care needs.
Coffea arabica (Arabica)
Arabica is the most commonly sold homegrown coffee plant for its superior flavor and lighter body. You’ll find it prefers cooler highland conditions and more care than robusta.
Coffea canephora (Robusta)
Robusta is hardier and more disease-resistant and yields higher caffeine. You’ll find robusta plants tolerate warmer, lower-altitude conditions and are often easier for beginners.
Specialty varieties (Bourbon, Typica, SL28, Gesha)
Specialty cultivars are chosen for unique cup profiles and historical importance. You’ll often pay a premium for these plants because of their potential for exceptional flavor and rarity.
Compact and dwarf cultivars for indoor growers
If you want a smaller footprint, you’ll want dwarf or compact cultivars designed for pot culture. These types are perfect when you’re keeping plants in apartments or small greenhouses.
What to look for when buying a homegrown coffee plant
Choosing the right plant ensures that you have a successful start and long-term health. You’ll want to inspect health, root structure, and provenance before purchasing.
Plant health indicators
Healthy leaves, new growth, and no visible pests or diseases are key signs. You’ll avoid plants with yellowing leaves, sticky residue, or extensive leaf loss.
Age and size
Young plants (6–12 months) are easier to ship and adapt, but older plants might fruit sooner. You’ll weigh the trade-off between quick fruiting and easier handling.
Provenance and disease-free certification
Sellers who provide provenance and nursery hygiene information reduce the risk of introducing pests or diseases. You’ll want documentation or clear communication about quarantine practices.
Seedling vs. grafted vs. rooted cuttings
Seedlings are genetically diverse and cheaper, grafted plants can combine desirable traits, and cuttings give exact clones of the mother plant. You’ll choose based on how predictable you want the plant’s traits to be.
Where to buy a homegrown coffee plant
There are several reliable channels where you can buy plants. You’ll want to pick a seller with good reviews and clear shipping practices.
Specialty nurseries
Specialty nurseries focus on coffee or tropical plants and usually provide healthier, well-labeled plants. You’ll get better advice and sometimes guarantees.
Online plant marketplaces
Online marketplaces offer variety and convenience. You’ll need to verify seller feedback and shipping practices to avoid disappointment.
Local garden centers and plant shows
Local sources allow you to inspect plants in person before purchase. You’ll reduce shipping stress and support local growers.
Direct from growers or coffee farms
Buying directly from growers may give you access to rare varieties and tips for specific microclimates. You’ll often get authentic provenance and sometimes bulk discounts.
Price range and what affects cost
Prices vary widely depending on variety, size, and rarity. Understanding cost drivers will help you make an informed purchase.
Typical price ranges
Common seedlings might cost $10–$30, while mature or specialty varieties can be $50–$200 or more. You’ll also pay more for established plants that are ready to fruit.
Factors that increase price
Rarity, proven quality, disease-free certification, and shipping costs increase price. You’ll expect higher prices for grafted plants, rare cultivars, and large, established specimens.
Shipping and hidden costs
Shipping, quarantine fees, import permits, or custom delays add hidden costs. You’ll include those in your total budget before purchasing.
Legal and quarantine considerations
Depending on where you live, importing live plants may require phytosanitary certificates and quarantine. You’ll need to check local regulations to avoid fines or plant destruction.
Import restrictions and permits
Many countries restrict live plant imports to prevent pests and diseases. You’ll contact your agricultural department or check their website for current rules.
Quarantine and inspection processes
Quarantine might be required on arrival, and inspections can delay delivery. You’ll prepare for possible waiting periods and additional fees.

Shipping and packaging best practices
Proper packaging keeps your plant healthy during transit. You’ll want to know what to expect and what to request from the seller.
How reputable sellers package coffee plants
Sellers use sturdy pots, secure soil, protective wrapping, and breathable packaging. You’ll look for sellers who stabilize roots and protect leaves during shipping.
Temperature-sensitive shipping
Plants are vulnerable to extreme heat or cold during transit. You’ll choose shipping options that avoid long delays and protect plants during adverse weather.
Receiving and unpacking your plant
Unpack immediately, check for damage, and give it time to acclimate before extensive pruning or repotting. You’ll gently water if the soil is dry and place it in a shaded spot for a few days.
Acclimatization and quarantine at home
After arrival, you’ll need to acclimate and monitor the plant to ensure pests or stress don’t spread to other plants.
Initial checks and isolation period
Isolate the new plant for 2–4 weeks and inspect for pests or diseases. You’ll prevent potential contamination of existing plants.
Gradual light and humidity adjustments
Move the plant gradually to its target location to prevent shock. You’ll avoid sudden changes in light or humidity to reduce leaf drop.
Potting, soil, and container choices
The right soil and container contribute to healthy root systems and better fruiting. You’ll pick materials suited to both plant needs and your space.
Soil mix recommendations
A well-draining, acidic mix high in organic matter works best. You’ll use a mix of peat or coco coir, pine bark, perlite, and compost for proper aeration and acidity.
Container types and sizes
Choose pots with drainage holes and enough room for root growth. You’ll start with a pot slightly larger than the current root ball and upsize every 1–2 years.
Repotting schedule and technique
Repot before the plant becomes root-bound and during active growth periods. You’ll gently tease roots if circling and add fresh mix to encourage expansion.
Light, temperature, and humidity requirements
Understanding the environmental needs helps you position the plant for optimal health. You’ll balance light and humidity to mimic natural understory conditions.
Ideal light conditions
Bright, indirect light with morning sun is optimal for most coffee plants. You’ll avoid harsh afternoon sun that burns leaves and consider filtered light for indoor plants.
Temperature range
Maintain day temperatures between 65–75°F (18–24°C) and night not below 55°F (13°C). You’ll protect the plant from frost and rapid temperature swings.
Humidity levels
Coffee prefers moderate to high humidity (50–80%). You’ll use humidity trays, humidifiers, or grouping plants to boost ambient humidity.
Watering and drainage best practices
Proper watering prevents root diseases and supports steady growth. You’ll adopt consistent routines to avoid both dry soil and waterlogged roots.
Watering frequency
Water when the top 1–2 inches of soil feels dry to the touch for potted plants. You’ll adjust frequency seasonally — more in warm months and less during winter dormancy.
Signs of overwatering and underwatering
Yellowing leaves and soggy soil suggest overwatering; dry, brittle leaves suggest underwatering. You’ll inspect the root zone if problems persist.
Drainage and irrigation systems
Good drainage prevents root rot; consider self-watering pots carefully. You’ll ensure excess water easily leaves the pot and avoid leaving containers in trays of standing water.
Feeding and fertilization
Balanced nutrition supports flowering and fruit development. You’ll plan a feeding schedule to complement soil quality and growth stage.
Recommended fertilizers
Use a balanced granular or liquid fertilizer with micronutrients and slight acidity. You’ll opt for formulations like 10-10-10 or ones designed for acid-loving plants, adjusting based on leaf color and growth.
Feeding frequency
Feed lightly every 4–6 weeks during growth, reducing or pausing in winter. You’ll monitor plant response and adjust accordingly.
Organic vs. synthetic options
Organic options (compost, fish emulsion, worm castings) improve soil biology, while synthetic fertilizers deliver nutrients quickly. You’ll balance both depending on your goals for sustainability and speed of response.

Pruning, training, and shaping
Pruning keeps the plant manageable and encourages better light penetration and fruiting. You’ll use shaping to maintain size and stimulate branching.
When and how to prune
Prune after harvest or during growth to remove dead wood and shape structure. You’ll cut just above a node and sanitize tools between cuts.
Encouraging branching for more flowers
Pinch back new shoots to encourage lateral growth and more flowering sites. You’ll selectively prune to maintain airflow and fruiting potential.
Training for indoor or bonsai forms
You can train coffee into compact or ornamental forms using stakes or wiring. You’ll keep roots slightly restricted to maintain smaller size if you prefer a decorative plant.
Pollination and flowering
Understanding how coffee flowers and is pollinated helps you maximize fruit set. You’ll encourage conditions that increase pollination rates.
Flowering cycle and timing
Coffee plants typically flower when conditions are right — often after a dry period followed by rain or increased watering. You’ll expect fragrant clusters of white flowers that precede cherries.
Self-pollination vs. cross-pollination
Many coffee varieties self-pollinate, but cross-pollination by insects can increase fruit set. You’ll encourage pollinators or hand-pollinate if growing indoors.
Supporting pollinators indoors
If you’re indoors, you’ll hand-pollinate using a soft brush or gently shaking flowers to transfer pollen. Outdoors, you’ll plant companion flowers to attract bees.
Harvesting coffee cherries and processing at home
Harvesting and processing are the most hands-on and rewarding parts of home coffee production. You’ll move from cherry to cup through a few key steps.
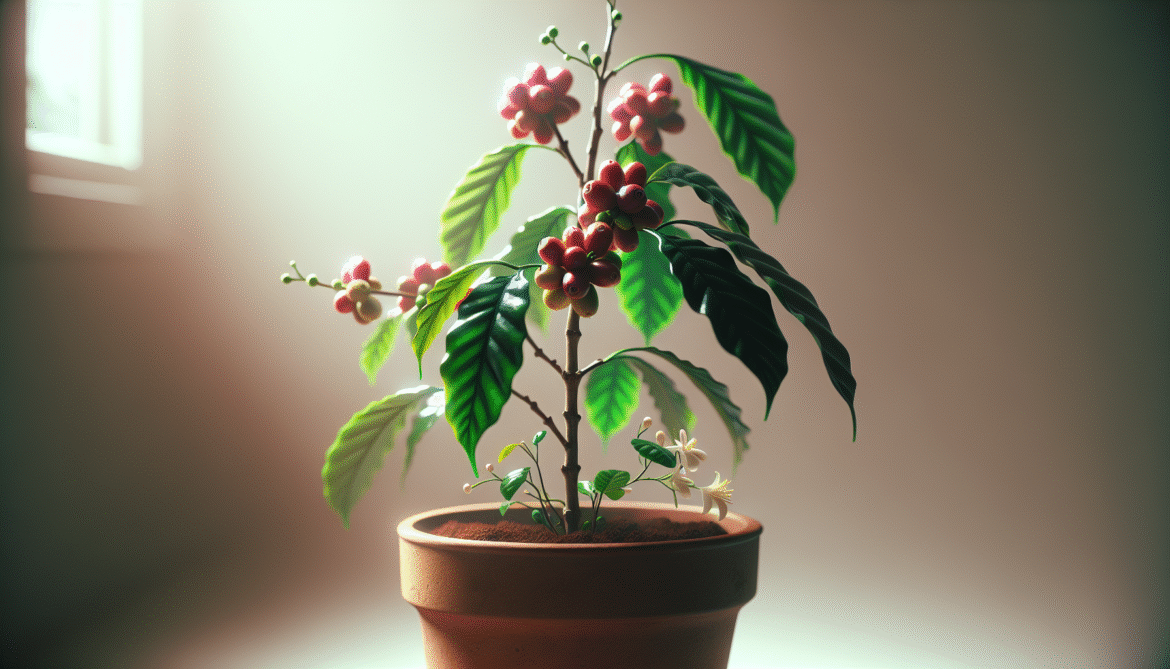
Recognizing ripe cherries
Ripe cherries turn from green to bright red or sometimes yellow depending on variety. You’ll pick cherries by hand for best quality and avoid bruising.
Processing methods: wet, dry, and honey
Wet processing involves fermenting and washing pulp; dry processing dries whole cherries; honey processing leaves some pulp during drying. You’ll choose a method based on equipment and flavor preferences.
Drying, hulling, and storage
Dry cherries or parchment must be dried to safe moisture levels before hulling. You’ll store dried green beans in cool, dry, airtight containers until roasting.
Roasting green beans at home
Roasting transforms green beans into the aromatic coffee you smell every morning. You’ll experiment to find flavors you love.
Basic home roasting methods
Use a small drum roaster, popper, skillet, or dedicated home roaster for small batches. You’ll monitor color and listen for the first and second crack to determine roast level.
Roast profiles and flavor changes
Light roasts preserve floral and acidic notes; darker roasts develop body and chocolatey flavors. You’ll keep careful notes to reproduce your favorite profiles.
Cooling and resting beans
Rapidly cool beans after roasting and rest them for 12–72 hours to allow off-gassing. You’ll store roasted beans in airtight containers away from light.
Brewing your homegrown coffee
Once roasted, brewing brings out the flavors you nurtured. You’ll use methods that highlight the characteristics of your roast.
Brewing methods to try
Try pour-over, French press, Aeropress, or espresso depending on bean quality and roast. You’ll adjust grind size, water temperature, and brew time to match your chosen method.
Grinds and ratios
Grind coarser for French press and finer for espresso. You’ll start with a 1:15–1:18 coffee-to-water ratio and tweak to taste.
Troubleshooting extraction
Under-extracted coffee tastes sour; over-extracted tastes bitter. You’ll adjust grind, dose, and brew time to achieve balance.
Pests and diseases: identification and control
Pests and diseases can harm your plant if left untreated. You’ll learn to identify common problems and use integrated management.
Common pests (scale, mealybugs, spider mites)
These pests sap plant vigor and leave visible signs like sticky residue or webbing. You’ll use insecticidal soap, neem oil, or manual removal as first-line controls.
Fungal and bacterial diseases (leaf rust, root rot)
Leaf rust causes orange spots, while root rot results from poor drainage. You’ll improve conditions, remove infected tissue, and use appropriate fungicides when necessary.
Preventative care and hygiene
Good airflow, proper watering, and quarantine for new plants reduce problems. You’ll keep tools clean and monitor plants regularly to catch issues early.
Table: Common pests and treatments
| Pest/Disease | Signs | Non-chemical Treatment | Chemical/Alternative |
|---|---|---|---|
| Scale | Bumps on stems/leaves, sticky honeydew | Scrape off, use alcohol swab | Horticultural oil |
| Mealybugs | White cottony masses | Wipe with alcohol, blast with water | Systemic insecticide |
| Spider mites | Fine webbing, stippled leaves | Increase humidity, wash leaves | Miticide |
| Leaf rust | Orange pustules on undersides | Remove infected leaves, improve airflow | Fungicide (copper-based) |
| Root rot | Yellowing leaves, mushy roots | Repot in fresh, well-draining mix | Fungicide drenches if early |
Propagation: make more plants from your stock
If you want more plants or to share with friends, you’ll propagate via seeds or cuttings depending on your goals.
Propagating from seed
Seeds are simple but genetically variable and can take years to fruit. You’ll plant fresh seeds in warm, moist conditions and expect slow but steady growth.
Propagating from cuttings
Cuttings produce clones of the mother plant and often root faster. You’ll take semi-hardwood cuttings, dip in rooting hormone, and keep humidity high until roots form.
Air-layering and grafting
Air-layering allows larger branches to root while grafting can combine rootstock vigor with scion traits. You’ll use these methods if you want advanced propagation strategies.
Selling your own homegrown coffee plants
If you grow more than you need, you might want to sell plants. This section helps you prepare plants for sale, price them, and handle transactions.
Preparing plants for sale
Clean the plant, repot if needed, and provide accurate descriptions of age, variety, and care. You’ll present clear photos and honest condition reports.
Pricing strategies
Price based on size, rarity, and local market demand. You’ll research similar listings and consider including shipping in your price.
Legal and ethical considerations
Follow local regulations for plant sales and be transparent about pest history and origin. You’ll disclose any treatments and provide basic care instructions to buyers.
Frequently asked questions (FAQ)
This section answers common questions you’ll likely have when buying or growing a coffee plant.
How long until my plant fruits?
Most seedlings fruit in 3–4 years, while grafted or mature plants may fruit sooner. You’ll see earlier flowering with optimal light, feeding, and care.
Can I grow coffee indoors year-round?
Yes, with the right light, humidity, and temperature you can maintain year-round growth. You’ll need to manage humidity and lighting during winter months.
Is coffee plant toxic to pets?
Coffee plants contain caffeine and can be toxic if animals ingest large amounts. You’ll keep plants out of reach of curious pets and monitor for chewing.
Do coffee plants need a period of rest?
Coffee plants often benefit from a cooler, slightly drier rest period to mimic seasonal changes. You’ll reduce feeding and watering slightly during this phase.
Troubleshooting common problems
You’ll face occasional problems; this section gives quick fixes for frequent issues.
Yellowing leaves with brown tips
This often indicates overwatering or salt buildup. You’ll flush the soil with clean water and check drainage.
Leaf drop after purchase
Shock, sudden light change, or temperature shifts cause leaf drop. You’ll provide stable conditions, keep the plant isolated, and avoid heavy pruning immediately.
Poor flowering or fruit set
Insufficient light, improper nutrition, or lack of pollination reduce fruiting. You’ll increase light exposure, adjust feeding, and consider hand pollination.
Final tips before you buy
Make a checklist to ensure your purchase goes smoothly and your plant thrives once home. You’ll feel confident and ready to care for your new coffee plant.
- Ask for photos of the actual plant and root condition.
- Confirm shipping times and weather protection.
- Verify return policies and quarantine documentation.
- Plan a dedicated spot in your home with proper light and humidity.
- Prepare quality soil mix and a suitable pot ahead of arrival.
Closing thoughts
Buying a homegrown coffee plant is both a hobby and a learning experience that connects you directly to the coffee you drink. You’ll gain patience, horticultural skills, and the joy of producing a cup that began as a plant in your care.