?Have you ever wondered exactly what your coffee plant goes through from seed to cup and how you should care for it at every step?

Coffee plant growth stages and practical care tips
This article walks you through the main growth stages of a coffee plant and gives practical, easy-to-follow care tips for each stage. You’ll learn what to expect, how to troubleshoot common problems, and how to optimize conditions so your plant thrives whether it’s in a backyard, a greenhouse, or a container.
Why understanding growth stages matters
Knowing the growth stages helps you give the right care at the right time. You’ll be able to set proper watering, lighting, feeding, and pruning routines to match the plant’s needs.
How growth stage affects care
Each stage has different nutrient, light, and water requirements. By tailoring your care to the stage, you’ll boost survival, growth rate, and future yield.
Overview of coffee plant biology
Coffee plants are evergreen shrubs or small trees primarily from the genus Coffea, most commonly Coffea arabica and Coffea canephora (robusta). You’ll find that the plant’s lifecycle includes seed development, germination, vegetative growth, flowering, and fruit (cherry) development.
Key plant parts and their roles
Leaves perform photosynthesis and indicate nutrient status; stems provide support and transport; flowers produce the fruit; roots absorb water and nutrients. Watching these parts helps you diagnose issues and respond quickly.
Main growth stages at a glance
Below is a simplified timeline showing the typical stages and the approximate time each stage may take under favorable conditions. Times vary by species, climate, and care.
| Stage | Typical duration | What you’ll see | Key care focus |
|---|---|---|---|
| Seed/Preparation | Days to weeks | Seed drying, selection | Seed quality, storage |
| Germination | 2–8 weeks | Radicle emergence, cotyledons | Warmth, moisture, humidity |
| Seedling | 2–6 months | First true leaves, delicate stems | Shade, consistent moisture, mild feeding |
| Juvenile/Vegetative | 6 months–2 years | Rapid leaf and stem growth | Light, fertilizer, shaping |
| Mature/Flowering | 2–4 years (arabica longer) | Flower buds, blossoms | Pollination, balanced feeding |
| Fruit development (cherries) | 6–9 months after flowering | Green then red cherries | Watering, nutrient support |
| Harvest | At maturity | Cherry harvesting | Proper picking and processing |
| Rejuvenation/Pruning | Ongoing | New shoots after pruning | Pruning timing and sanitation |
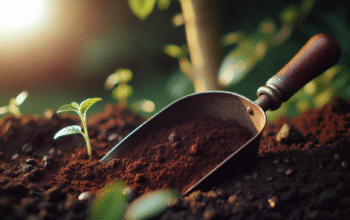
Stage 1 — Seed selection and preparation
Seeds (often called green coffee seeds or beans) are the starting point. Good seed quality, proper storage, and pre-treatment determine germination success.
Choosing seeds
You’ll want fresh seeds from a reputable source; green coffee that’s too old will have poor viability. If possible, use freshly harvested seeds or seeds from healthy mother plants.
Seed storage and pretreatment
Store seeds in a cool, dry place wrapped in breathable material. You can soak seeds briefly in water for 12–24 hours to help rehydrate older seeds, but avoid prolonged soaking that causes rot.
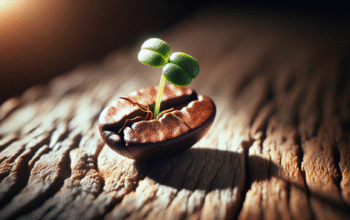
Stage 2 — Germination
Germination is when the radicle emerges and the seed begins to sprout. This is a critical, vulnerable phase that needs stable moisture and warmth.
Conditions for successful germination
Maintain temperatures around 20–28°C (68–82°F) and keep the medium consistently moist but not waterlogged. High humidity helps, so using a humidity dome or plastic cover is useful.
Medium and container choices
Use a well-draining, sterile seed-starting mix to reduce disease risk. Shallow trays or small pots work well; avoid deep planting that makes it harder for the seedling to emerge.
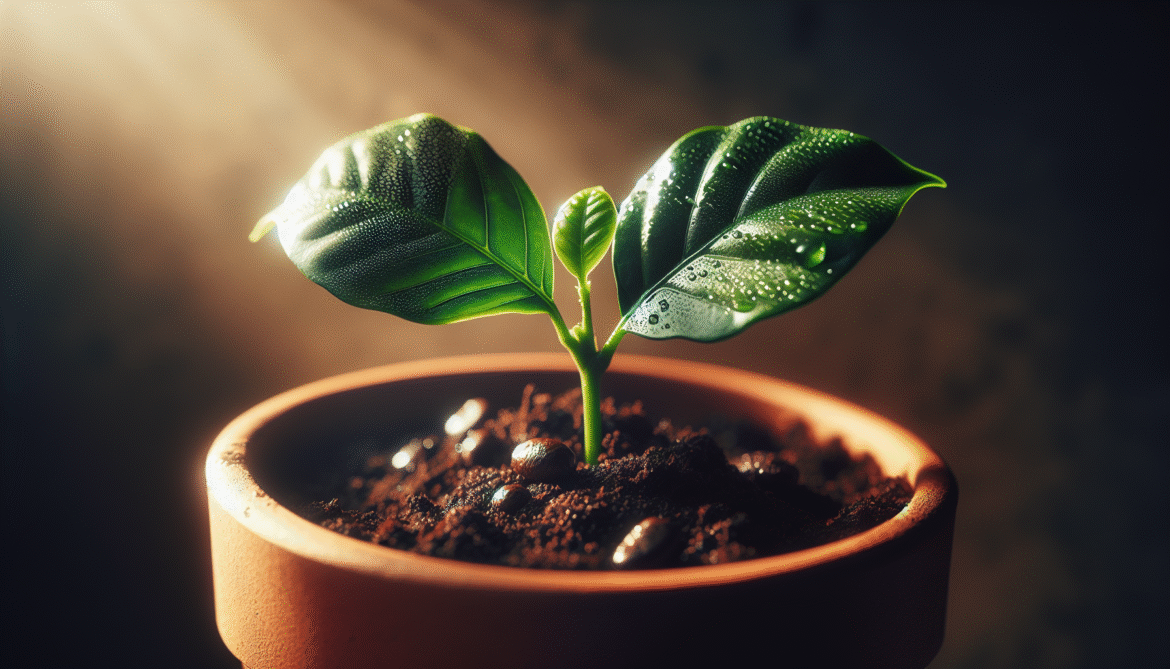
Stage 3 — Seedling care
When the first true leaves appear, your plant enters the seedling stage and requires gentler, consistent care. Seedlings are sensitive to extremes.
Light and temperature
Provide bright, indirect light—direct noon sun can scorch young leaves. Keep temperatures in the 20–25°C (68–77°F) range; avoid cold drafts and sudden drops.
Watering and humidity
Water regularly to keep the soil evenly moist but not saturated. Aim for 60–80% humidity if possible; you can use a humidifier or group plants together to raise local humidity.
Feeding seedlings
Start with a very diluted, balanced fertilizer after the first few sets of true leaves. Use quarter-strength liquid fertilizer once every 2–4 weeks until larger.
Stage 4 — Juvenile and vegetative growth
During this stage your plant grows quickly, producing many leaves and a stronger root system. You’ll shape its future structure now.
Potting and root space
If you started in small pots, transplant to larger containers or the ground once roots fill the pot. Use rich, well-draining soil with organic matter. Allow room for root expansion to avoid root-bound stress.
Light requirements
Provide bright, filtered light—some afternoon shade is ideal in hot climates. In subtropical or greenhouse setups, you can give more direct sun with gradual acclimation.
Fertilizer and soil nutrients
Apply a balanced fertilizer with slightly higher nitrogen during active vegetative growth. Consider slow-release granular or regular applications of liquid feed. Include micronutrients like magnesium and iron to prevent deficiencies.
Stage 5 — Maturity and flowering
Most coffee plants reach first flowering between 2–4 years depending on species and growing conditions. Flowering indicates that roots and canopy are mature enough to support fruit set.
Flowering triggers
Flowering often follows seasonal changes—especially after a dry period followed by rains in outdoor cultivation. In controlled environments, light cycles and watering patterns can influence blooms.
Pollination and blossom care
Coffee flowers are typically self-fertile, but pollination by hand or insects can increase fruit set. Maintain moderate humidity and avoid excessive nitrogen at bloom time, because that can favor leaf growth over flowers.
Stage 6 — Fruit (cherry) development and maturation
After successful pollination, flowers give way to fruit that develops over several months. Fruit transitions from green to yellow to red (or yellow in some varieties).
Watering during fruiting
Keep water consistent during fruit development; severe drought can cause fruit drop. Avoid waterlogging, which can promote root disease and fruit quality issues.
Nutrient needs for fruit formation
Switch to a balanced fertilizer with a bit more potassium to support fruit development. Phosphorus supports root health while potassium improves fruit size and flavor precursors.
Stage 7 — Harvesting
You’ll harvest when cherries are fully ripe—typically red for arabica. Timing affects cup quality and post-harvest processing outcomes.
Harvest methods
Selective hand-picking of ripe cherries gives the best quality but is labor-intensive. Strip harvesting (all cherries at once) is faster but mixes ripe and unripe fruit and is used more for large-scale robusta operations.
Post-harvest basics
Once picked, cherries must be processed quickly to prevent fermentation and quality loss. Two main methods are wet (washed) and dry (natural) processing; each gives different flavor profiles.
Propagation methods
You can propagate coffee by seed, stem cuttings, or grafting, depending on your goals. Seeds maintain genetic variability while cuttings preserve the traits of the mother plant.
Seed propagation
Growing from seed is common and simple. You’ll get plants adapted to the starting seed’s genetics but with variability.
Cuttings and cloning
Cuttings produce clones of a known cultivar, preserving desirable taste traits and diseases resistance. Use semi-hardwood cuttings with rooting hormone in a moist, sterile medium.
Grafting
Grafting can combine disease-resistant rootstock with a desirable scion variety. This is advanced but useful in problematic soils or for specialty production.
Containers vs. in-ground growing
You can grow coffee in pots indoors or outdoors, or plant it in the ground in suitable climates. Each approach has pros and cons for space, root depth, and microclimate control.
Container growing tips
Choose pots with good drainage and use a quality, airy potting mix. Expect to repot every 1–3 years to refresh soil and provide more room for roots.
In-ground planting considerations
Plant in well-draining soil with organic matter, slightly acidic pH (ideally 6.0–6.5). Protect plants from strong wind and frost in marginal climates.
Soil and pH recommendations
Coffee prefers slightly acidic, loamy, well-draining soils rich in organic matter. pH should be around 5.5–6.5 for best nutrient uptake.
Improving poor soils
Amend sandy soils with compost and peat or coconut coir to improve water retention and organic content. Clay soils benefit from coarse sand and organic matter to improve drainage.
Light and shade management
Coffee plants are naturally understory species and prefer dappled sun rather than full, harsh sun. You can give them morning sun and afternoon shade or use shade cloth.
Shade benefits and management
Shade reduces water stress and sunburn, and in some cases improves bean quality by moderating growth and prolonging maturation. However, over-shading reduces yield and can cause weak, leggy growth.
Watering guidelines
Consistent moisture is crucial, but roots must not sit in water. Water frequency depends on climate, container size, and growth stage.
Practical watering schedule
- Seedlings: keep medium evenly moist, mist if needed.
- Vegetative: water when the top 2–3 cm (0.8–1.2 in) of soil is slightly dry.
- Flowering/fruiting: maintain more consistent moisture to prevent flower/fruit drop. Use irrigation or a self-watering system for steady supply, especially during fruit development.

Fertilization schedule and recipes
A balanced feeding program supports healthy growth, flowering, and fruiting. Consider both macro- and micronutrients.
General fertilization plan
- Seedlings: very dilute balanced fertilizer (e.g., NPK 10-10-10) every 3–4 weeks.
- Vegetative growth: higher nitrogen applications to support leaf and stem growth.
- Flowering/fruiting: balanced NPK with increased potassium; reduce excessive nitrogen to prevent vegetative dominance.
- Yearly: add slow-release organic matter like compost or well-rotted manure.
Example fertilizer table
| Growth stage | Frequency | Type | Notes |
|---|---|---|---|
| Seedling | Every 3–4 weeks | Diluted balanced liquid | Quarter- to half-strength |
| Vegetative | Every 4–8 weeks | Balanced or N-lean formula | Support growth, avoid overfertilizing |
| Pre-flowering | 1–2 months before | Balanced with P | Encourages bud formation |
| Fruiting | Every 4–6 weeks | K-rich balanced feed | Boosts fruit development |
| Maintenance | Annually | Compost or slow-release | Soil structure and micronutrients |
Pruning and training
Pruning shapes the plant, encourages branching, and maintains productivity. Training early lets you control size and ease harvest.
When and how to prune
Prune after harvest or during a rest period to remove dead wood, weak branches, or suckers. Keep the canopy open to improve air circulation and light penetration.
Formative pruning
Form a strong central framework by selecting 3–4 main stems for structure in the first 1–2 years. After maturity, maintain a lower canopy height for easier harvesting.
Pests and diseases
Common insect pests include scale, aphids, and mealybugs; diseases include leaf rust, root rot, and coffee berry disease. Early detection and appropriate measures keep damage manageable.
Preventive cultural practices
Good sanitation, proper spacing, and healthy soil reduce pest and disease pressure. Avoid overwatering and excessive shade that favor fungal diseases.
Organic and chemical control options
You can use neem oil, insecticidal soaps, and biological controls for many pests. For severe infestations or specific diseases, targeted fungicides or pesticides may be required—follow local regulations and safety guidelines.
Common problems and troubleshooting
You’ll encounter issues like yellowing leaves, leaf drop, or stunted growth. Addressing each symptom requires checking multiple factors like water, nutrients, light, and pests.
Diagnosing leaf yellowing
- Uniform yellowing with green veins points to nitrogen deficiency.
- Yellowing with brown spots may indicate fungal disease or sunburn. Check soil moisture, pH, and look for pest signs on the underside of leaves.
Handling bud and blossom drop
Bud drop often results from temperature extremes, drought stress, or sudden changes in moisture. Keep conditions stable and avoid over-fertilizing with nitrogen during bloom.
Climate considerations
Coffee thrives in tropical and subtropical climates with steady, mild temperatures and distinct wet/dry cycles. If your climate is cooler or drier, you’ll need to adapt care.
Frost protection
Coffee is frost-sensitive. Move containers indoors or provide frost cloths when temperatures dip near freezing. Insulate pots and avoid pruning right before cold snaps.
Greenhouse and indoor growing
Using a greenhouse or bright indoor space gives you control over temperature and humidity. Provide supplemental light in low-light winters and maintain steady moisture.
Harvesting and processing basics
How you pick and process cherries affects flavor and shelf life. Learn basic wet and dry methods suitable for small-scale growers.
Wet (washed) processing
Remove the pulp quickly, ferment the mucilage if needed, wash thoroughly, and dry the parchment. Washed processing often yields brighter, cleaner cup profiles.
Dry (natural) processing
Spread whole cherries to dry in thin layers, turning regularly until moisture content is low enough for storage. Naturals can produce fruity, full-bodied flavors but require careful monitoring to prevent fermentation problems.
Storage and post-harvest care
Store dried parchment or green beans in a cool, dry place to maintain quality. Protect beans from moisture, pests, and strong odors.
Ideal storage conditions
Keep beans in airtight bags or containers at stable temperatures, relatively low humidity, and away from direct sunlight. For long-term storage, consider vacuum sealing or cool, dry basements.
Timeline checklist for a year-round care routine
Here’s a simplified annual checklist to help you manage tasks through the seasons.
| Month/Season | Tasks |
|---|---|
| Early year (pre-flower) | Evaluate plant health, balance fertilization, adjust watering to encourage bud set |
| Flowering season | Keep humidity stable, monitor pollination, avoid sudden nutrient shifts |
| Fruit set and development | Maintain consistent moisture, apply K-rich feed, watch for pests |
| Harvest | Pick ripe cherries, process promptly |
| Post-harvest / rest | Prune, replenish soil organic matter, plan repotting or propagation |
Growing coffee indoors as a hobby
You can grow coffee indoors as an attractive, useful houseplant. With attention to light and humidity, you can even get flowers and cherries.
Indoor care specifics
Place your plant in bright, indirect light near an east- or west-facing window. Keep humidity high with a pebble tray, humidifier, or grouping with other plants.
Advanced tips for improving yield and quality
- Match variety to climate and elevation for best cup traits.
- Implement mulching to conserve moisture and add organic nutrients.
- Use foliar feeding sparingly for quick micronutrient correction.
- Consider intercropping or companion plants (legumes) to improve soil nitrogen and biodiversity.
Sustainability and ethical considerations
If you’re producing for consumption or sharing beans, consider sustainable practices like composting, using organic fertilizers, and avoiding harmful pesticides. Support biodiversity and soil health to improve long-term productivity.
Small-scale farm practices you can use at home
Use compost, rainwater harvesting, and avoid synthetic inputs where possible. These practices help your plant and the local environment.
Final troubleshooting checklist
If your coffee plant is struggling, walk through these checks in order:
- Is the root system healthy? (repot and inspect)
- Is soil pH and nutrient balance appropriate?
- Are watering and drainage adequate?
- Is lighting suitable for the growth stage?
- Are pests or diseases present?
Answering these questions usually points to the right corrective action.
Summary and practical next steps
You’ve seen the full lifecycle of a coffee plant and practical care tips for each stage. Start by assessing what stage your plant is in, then apply the specific care routines described here—watering, feeding, light management, and pruning—while keeping an eye on pests and diseases. With consistent attention and small adjustments to match your local conditions, you’ll increase your chances of healthy plants and a satisfying harvest.
If you want, tell me about your plant’s current stage, container size, and climate, and I’ll give tailored care steps you can follow this month.